Services listening to network requests on macOS
I decided to toy around with Apache on macOS High Sierra and
wanted to make sure it only listens to localhost connections.
To check open ports, you can use netstat like this:
# netstat -anvp tcp | awk 'NR<3 || /LISTEN/'
Active Internet connections (including servers)
Proto Recv-Q Send-Q  Local Address          Foreign Address        (state)     rhiwat shiwat    pid   epid
tcp6       0      0  *.49782                *.*                    LISTEN      131072 131072    323      0
tcp4       0      0  *.49782                *.*                    LISTEN      131072 131072    323      0
tcp4       0      0  127.0.0.1.80           *.*                    LISTEN      131072 131072   4952      0
tcp6       0      0  *.49153                *.*                    LISTEN      131072 131072     60      0
tcp4       0      0  *.49153                *.*                    LISTEN      131072 131072     60      0
tcp4       0      0  *.3050                 *.*                    LISTEN      131072 131072    161      0
Ok, Apache is fine, but this got me curious. PID 60 is
XBox360 controller driver and PID 323 is rapportd. Why either
of those needs to listen for network connections is beyond me.
PID 161 is FirebirdSQL DBMS, so I disabled it as I don't
really need it currently, by editing the file:
/Library/LaunchDaemons/org.firebird.gds.plist
and setting the keyname Disabled to true.
I'm still looking for a way to disable rapportd and XBox360 daemon.
Feedback & Share
Milan Babuškov, 2021-11-14
Hiding some users from macOS login screen
Installing software like Firebird DBMS adds users to your
macOS system. In this particular case it added the user firebird, but
I also wanted to toy around with the Firebird embedded variant, which
has some magic for SYSDBA user. So I also added user named SYSDBA manually.
The problem is that my login screen now shows a bunch of accounts
that cannot really be used. It's incredible that macOS has no GUI
to simply exclude some accounts from the login screen. I guess it can
pose a support problem down the line when people forget they hid
some account and have no idea how to get it back... oh well.
Anyway, there's a way to at least bundle all of those accounts you
don't need into a Other category. It's done with a command like this one:
sudo defaults write /Library/Preferences/com.apple.loginwindow HiddenUsersList -array-add username
The only problem is that this setting gets ignored after restart
if you use full-disk encryption. Apparently the setting is stored in
the encrypted part of the disk, and Mac shows the login screen before
you decrypt it. Not really sure where it reads the list of users
from in that case?
Feedback & Share
Milan Babuškov, 2021-10-29
Using CheapSSLs certificates with stunnel
CheapSSLs website sells cheapest mainstream SSL certificates currently.
Apparently they are part of NameCheap group and also run ssls.com website.
Prices are really low, and running SSL is not really that expensive anymore.
In my setup, I'm mostly using stunnel in front of HAProxy, which then
does load-balancing to a bunch of nginx, Apache and node.js servers.
Configuring each of those for SSL would be PITA, so I'm simply using
stunnel. The only drawback was getting IP addresses of connected web clients.
This can be solved with proxy protocol using HAProxy 1.5, but I also use
websockets and json-polling and xhr-polling
with node.js and socket.io I cannot use the proxy protocol. So I patched
stunnel 5.0 with 4.x patch you can find on the net, to give me
additional HTTP headers.
When you apply for SSL cert at cheapssls, they ask for the type of
web server and even though there are 20+ options, stunnel is not one
of them. So I picked "other". I got three files:
- mydomain.csr
- AddTrustExternalCARoot.crt
- PositiveSSLCA2.crt
BTW, to create the certificate request, I used the same
procedure as with GoDaddy.
I tried to set it up using intuition and previous experience with
GoDaddy, but it just would not work. I would get this error:
[!] SSL_CTX_use_PrivateKey_file: B080074: error:0B080074:x509 certificate routines:X509_check_private_key:key values mismatch
[!] Service [domain]: Failed to initialize SSL context
So I tried to use the CAfile setting, copy/paste certificates again,
and stunnel just would not start. If I removed intermediate certificates
it would work, but then it would not support all the browsers out there.
Finally, after a lot of trial and error and trying out various howtos
on the net, I got it working. Here's how to do it. First, create a file
containing your certificate, intermediate certificate and root certificate,
in that exact order. This is important, because it would not work
otherwise:
cat yourdomain.crt PositiveSSLCA2.crt AddTrustExternalCARoot.crt > all.pem
Next, set up a stunnel.conf file like this:
cert=/full/path/to/all.pem
key=/full/path/to/yourdomain.key
Do not use the CAFile setting at all. And that's it. It's really simple
once you get it working.
Feedback & Share
Milan Babuškov, 2014-03-26
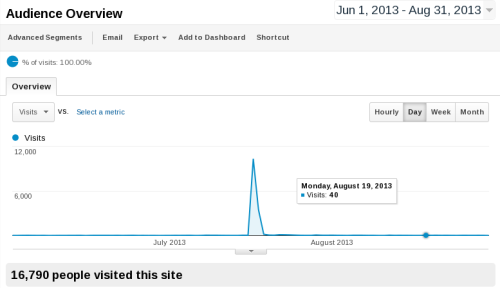
How much traffic can you expect from Hacker News front page
In mid of July I posted a link to my blog post about Yahoo! Mail
(see previous post) to Hacker News. The post was quickly
picked up, and reached the front page:

HN effect lasted for two days. As soon as the story left the front page,
traffic dropped. My blog gets 30-40 visits per day usually.
In those two days, it got about 14000:
The only feedback and social sharing mechanism I use on this blog is
Twitter. As a side effect, I also got about 10 new Twitter followers
in those few days.
Conclusion: HN posting could be useful to get some attention, but
keep in mind that it would only last for a day or two. As you may
notice, I don't have any ads on my blog, the real purpose of my blog
posts is just sharing my thoughts with the community.
Feedback & Share
Milan Babuškov, 2013-09-02
Yahoo! Mail is not catching up anymore. Your move GMail
Using GMail with intermittent connection on my Android device has
always been slow, but I simply thought that's the way things should be.
Some two months ago, I needed to read my, over a decade old @yahoo.com
mail, and I installed Yahoo! Mail app on my Android. What a pleasant
surprise that was. It is FAST. Much faster than Gmail. I wrote YMail off
on the desktop, but on mobile it was clearly better and I enjoy reading
and sending mail on it.
Today, I logged into Yahoo! Mail on my desktop machine, and I was
in for another surprise. They fixed the "paging" issue, and made it
run even faster than before. Replies are much easier than using GMail's,
recently introduced narrow space. Not to mention that PageUp and PageDown
keys work properly:
GMail has caused so much pain to me lately. A couple
of e-mails sent accidentally because I pressed PageDown and hit space.
Instead of moving the cursor to bottom and adding space, GMail moved the
focus from text box to the Send button and pressing Space key on it
made it send the message. Also, it's impossible to select text with Shift+PageDown
in GMail. Unless you have 30" monitor which is presumably why all the
Google engineers are completely unaware of the issue. GMail reply is
UX nightmare on laptop with standard resolution like 1280x800 or 1366x768.
Another issue I had with Yahoo mail in the past is also gone. Earlier
when you had a lot of messages to select (say, like 100+) you would
either have to scroll page-by-page in old, classic view or you could
switch to modern one which would load everything. With 1000+ messages
in my, 14-year old, inbox this posed a problem. Now they fixed that. I
loads initial set of messages and keeps loading more as you scroll down.
When I reach those 100-something messages I need to select, I can easily
select them all in one go. Not that I think about it, GMail does not
have this feature, so that's one more reason to use YMail.
Let's face it, with free GMail for domains removed from market, and
latest improvements in Yahoo Mail, Yahoo seems to be a clear leader now.
It's faster, has more features, and it's much easier to reply to messages.
I hope GMail team wakes up soon.
Feedback & Share
Milan Babuškov, 2013-07-18
Gods of Sparta: Indie strategy game
Gods of Sparta is a card
strategy game I've been working on in the past 3 months. It's a
card combat game, but without all the trading, collecting, booster
pack nonsense that makes you waste money on cards that you'll never
use. The game is oriented on strategy, both players have equal chance
to win, and it's played in real-time (although it's turn based, players
have about 30 seconds to play their move). It's really easy to learn,
but hard to master.
5 designers were hired to create graphics
for the units, while I did programming and all the rest. Visit the Gods of Sparta website
to try it out
Feedback & Share
Milan Babuškov, 2013-07-16
Creating Checkbox or Toggle button with EaselJS (CreateJS)
Creating a checkbox is rather simple, but here's some code that
you can use in your project without having to invent it yourself.
For checkbox or toggle button we need two images representing the
states: checked/unchecked, on/off, yes/no, etc. You need to prepare
those two images and load them into a createjs.Bitmap. In the game I'm
creating, I used these two images:

Of course, you can place both images in a single file and then
use sourceRect property to create two bitmaps. The code would go like
this:
var imageUnchecked = new createjs.Bitmap('checkboxen.jpg');
imageUnchecked.sourceRect = new createjs.Rectangle(0, 0, 34, 29);

var imageChecked = new createjs.Bitmap('checkboxen.jpg');
imageChecked.sourceRect = new createjs.Rectangle(34, 0, 34, 29);
Now that we have both images, lets create a checkbox. All you need
is a simple function call:
var xPos = 100;
var yPos = 100;
var initialState = true;    // checked initially
var btn = new toggleButton(xPos, yPos, imageChecked, imageUnchecked,
    initialState, function(isChecked) {

    if (isChecked)
        // do something
    else
        // do something else

});
To read the state later, outside of click handler, use the following code:
if (btn.checked)
{
    // ...
}
Of course, for this to work, you need toggleButton function. Here it is:
function toggleButton(x, y, checkedImg, uncheckedImg, initialState, onClick)
{
    var self = this;
    self.checked = initialState;

    checkedImg.x = x;
    checkedImg.y = y;
    checkedImg.visible = initialState;
    checkedImg.cursor = 'pointer';

    uncheckedImg.x = x;
    uncheckedImg.y = y;
    uncheckedImg.visible = !initialState;
    uncheckedImg.cursor = 'pointer';

    var checkClick = function(newState) {
        self.checked = newState;
        uncheckedImg.visible = !newState;
        checkedImg.visible = newState;
        onClick(newState);
    };

    checkedImg  .addEventListener('click', function() { checkClick(false); });
    uncheckedImg.addEventListener('click', function() { checkClick(true); });
}
The code above is public domain. Feel free to use and modify it.
Feedback & Share
Milan Babuškov, 2013-07-11
How to apply grayscale filter to image using EaselJS (CreateJS)
Searching the Google for grayscale easeljs leads to some
obscure StackOverflow Q&A from 2011. which has a working example.
However, it uses a generic filter matrix so you would need to know how
grayscale effect actually works on pixel level to understand what it
does.
It's much easier to use Easel's built-in functions. However, those
are not easy to discover using a search engine. You have to dig into
docs. Here's an easy way to do it, adapted from Easel docs.
Assuming you have a Bitmap, Container, Shape in variable myDisplayObject:
var matrix = new createjs.ColorMatrix().adjustSaturation(-100);
myDisplayObject.filters = [new createjs.ColorMatrixFilter(matrix)];
myDisplayObject.cache();
Make sure you call cache() at the end, because filters are only applied
during caching. If you wish to use different filters for different objects
in a container, you need to cache() each one separately before adding
to container.
Now, you might run this example, and get the error message createjs.ColorMatrix() is not a constructor
because createjs.ColorMatrix is undefined. The reason for this is that
current version of minified files does not include filters, so you
need to include ColorMatrixFilter.js script in your page
separately. Lanny says
it will be included in one of future versions. I'm not sure that's a good
idea though. I doubt many users use filters. I almost built the entire
game without it, and only want to include it for Medusa's petrifying
effects.
Feedback & Share
Milan Babuškov, 2013-06-18
Callback when all images in HTML page are loaded, with custom timeout
I'm developing a HTML5 game and although there are many ways to
track image loading, they mostly use XHR which does not work reliably
in different browsers. I don't care about progress bars, but I do
compose images after loading (using EaselJS cache) and need to make
sure images are loaded before caching.
The usage is really simple. In case some of the images fail to load,
or takes too long, you could have a problem that program would not
go on, and user won't see anything. To avoid this, I added a custom
timeout, after which the callback would be called regardless. The
timeout resets after each successfull download, so don't set it
too high. The example below uses 12 seconds:
// 1. create image loader
var imageLoader = new ImageLoader(12);

// 2. feed it some URLs
imageLoader.add('shadow', 'http://mycnd.com/shadow.jpg');
imageLoader.add('ball',   'http://mycnd.com/ball.png');
imageLoader.add('player', 'http://mycnd.com/player.png');

// 3. wait for load to complete and then do something with the images
imageLoader.loadAll(function() {

    // do something, like for example:
    var ballSprite = new createjs.Bitmap(
        imageLoader.get('ball'));

});
The code uses alert() in two places. Please replace that with
whatever error handling you use.
Also, there could be a better/faster way to detect image files that are
not available (HTTP code 404 and similar), so that we don't have to
wait for timeout.
View and download the source code at https://github.com/mbabuskov/ImageLoader.
Feedback & Share
Milan Babuškov, 2013-06-10 Past posts
